6 Step Guide to EASY Casting for your Dog's Knee Brace

Casting a dog's leg is by no means an easy task, especially if it’s your first time. Getting a good cast of your dog's leg is the most important step in getting a custom dog knee brace since the cast will serve as the model for the brace. A bad cast means that the brace won’t fit. Don’t worry, there’s a lot you can do before casting to ensure that you will have a good cast even if it’s your first time. We will look at each step to ensure you have the best casting experience possible for both you and your pup.
1. Preparation
-
We suggest you have plenty of treats for your pup to reward them through what may be a stressful experience for them since they won’t be able to move during the casting.
-
To keep them still, you will need a few friends or family members to help you out. We suggest having at least 3 people but we find the more the merrier and you may want more people if your dog is extra excitable.
IT TAKES A CROWD

-
There is a Stifle (dog knee) brace casting video on the AOC website, you and your team should watch the video at least once to get the basic procedure in your mind.
-
Designate a task to each person so everyone knows what to do. For example, for a team of 4 people, one person could be in charge of holding the stockinette and cut strip, one person is casting, one person is holding the dog's leg, and one person is comforting the dog.
-
Pick a room to do the casting that has plenty of room for your dog and casting team, you’ll need enough room for everyone to fit without bumping heads too much. This room should also be free of distractions since both you and your dog will need to be calm and focused.
-
If you have long hair, put it up while casting so you don’t accidentally get your hair wrapped in the cast!
-
Of course, you'll need your dog!
-
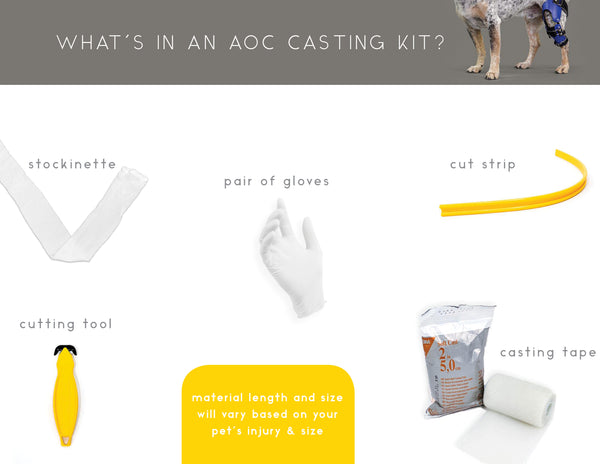
Gather all your casting supplies, which include the casting tape, cut strip, stockinette, a bowl of warm or room temperature water, gloves, and the cutting tool. Have these items close by when you’re doing the casting. DO NOT open the casting tape package until AFTER the stockinette & cut strip is on your dog's leg and you are ready to start casting. The casting tape will harden and you won't be able to cast your dog's leg if you open it too soon.
2. Dog Positioning
-
Depending on your dog, he/she may not be comfortable with having to lay down and be surrounded by a group of people doing weird things with his/her legs. This means that they may try to stand up while you're in the middle of casting. DON’T let them stand up or move their leg!
-
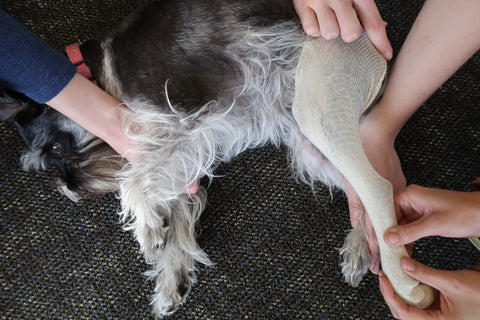
To safely hold your dog down, have one person hold their front leg closest to the ground down with either their arm or other hand on the side of your dog’s neck without suffocating them. If they have their other hand free then they can easily pet and comfort your dog which will help keep them still. It shouldn't take too much pressure to hold your dog down once they have settled. You can do the same with the hind leg not being casted if your dog is very excitable.
MANY TEAM MEMBERS WILL HOLD YOUR DOG
-
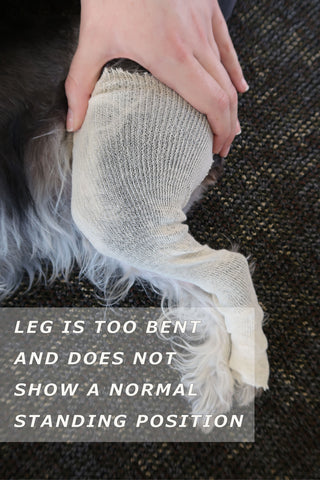
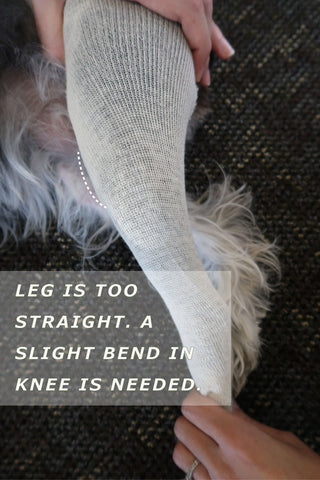
Your dog’s leg should be in a natural standing position while they are laying down. This ensures that the brace will be made to the proper position for when your dog will be using their brace the most: when they’re up and running! Don't pull your dog's leg too straight and don't let them bend their knee or try to stand up.
BAD CAST |
OK CAST |
GREAT CAST |
 |
 |
|
3. Stockinette and Cut Strips
-
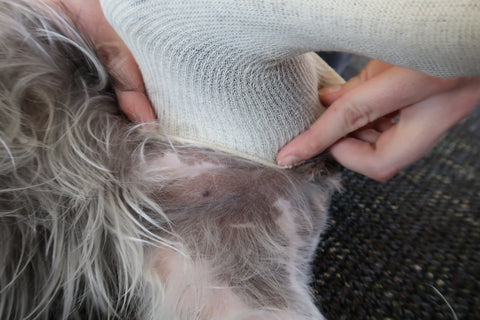
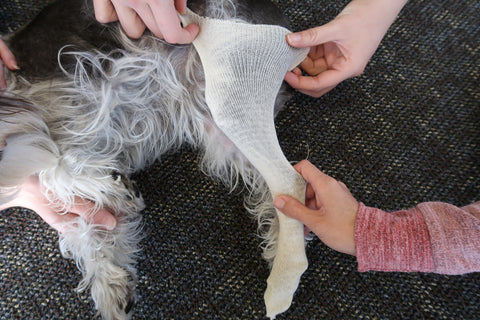
Pull the stockinette all the way up on your dog's leg and have someone hold it slightly spread out on the dog's body just above the leg. Pay close attention to both the outside and inside of your dog's leg since fur grows on both sides. This will minimize the risk of accidentally getting their fur caught in the cast. If you do get some fur in the cast, carefully use scissors to trim the hair closest to the cast, NOT your dog's body!
STOCKINETTE HELD AGAINST BELLY |
STOCKINETTE HELD ON HIP |
 |
 |
-
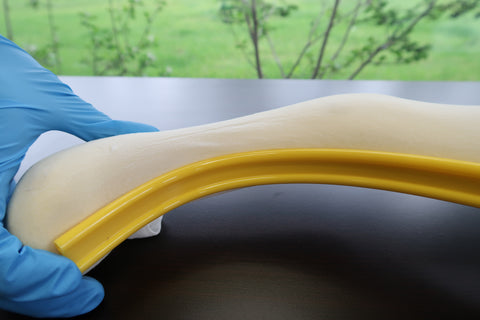
Don't place the cut strip on the side or back of your dog's leg, cutting will be difficult and may interfere with the shape of the cast too much. Placing the cut strip on the front of the leg will make cutting much easier and will reduce the risk of the cutting tool slipping off the cut strip.
PROPERLY PLACED CUT STRIP
-
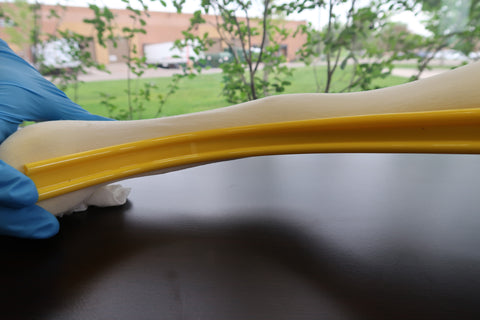
Cut strips vary based on dog size to minimize bulk in the cast. All cut strips work the same to help prevent the cutting tool from sliding around too much when you are cutting. However, the tool may slide somewhat and your cut may not be straight.
CUT STRIP
-
When you are casting, the cut strip may move and end up diagonal. This will make cutting slightly more challenging but we recommend you mark along the cut strip with a pen or pencil first so you can follow the cut strip.
GOOD CAST

- DO NOT FORGET THE STOCKINETTE OR CUT STRIP! If you forget to place the stockinette or cut strip before casting your dog, removing the cast will be extremely challenging and stressful for both you and your dog.
4. Casting
-
If you're doing bilateral casts (casts on both sides), do one at a time. There isn't enough space for two casts to be done at the same time even if you have enough people.
-
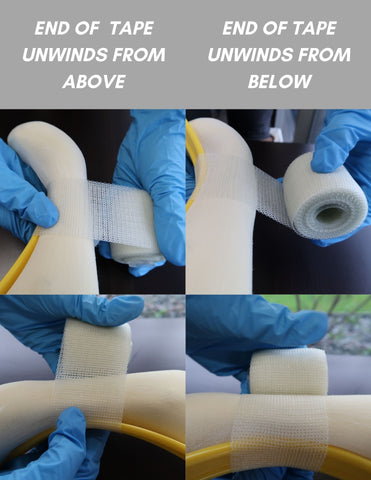
When beginning to wrap your dog's leg, there are two ways to unwind the casting tape. One way is to unwind the tape so the end is on top and the roll is on the bottom, like placing regular tape in a tape dispenser. The other way is going in the opposite direction so the end of the tape is on the bottom with the roll on the top. We find this way is best for preventing accidental dropping of the tape. However, there is no wrong way to unwind the tape so do what feels natural to you.
-
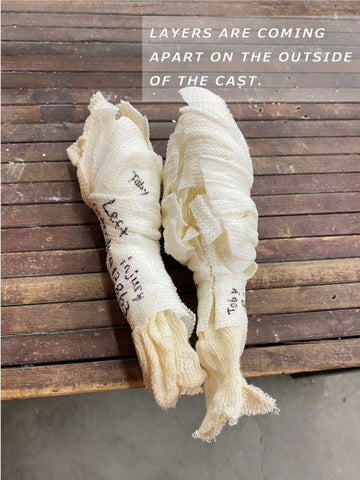
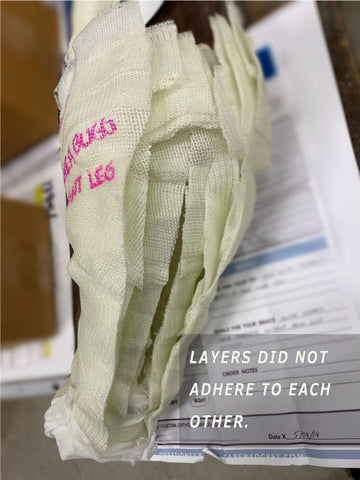
Using hot water may cause your casting material to set or cure faster, meaning you have less time to wrap your dog's leg. If it sets up too quickly, then the layers won’t adhere to each other and your cast will fall apart. Make sure to use warm or room temperature water so the casting material sets slower. Keep in mind that the casting material will set up in 1-3 minutes with warm-room temperature water so wrap quickly!
BAD CAST
-
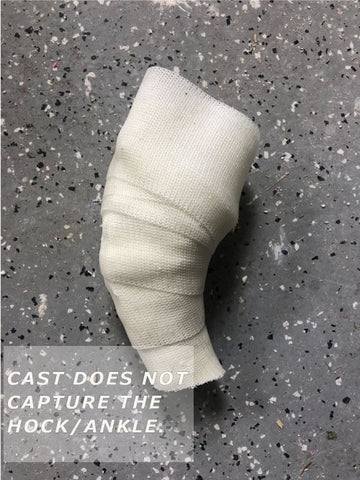
When beginning the wrap, be sure to start below the hock (ankle) of your dog’s leg. The hock is needed to ensure that your dog’s knee brace will be long enough to support their entire leg.
BAD CAST
-
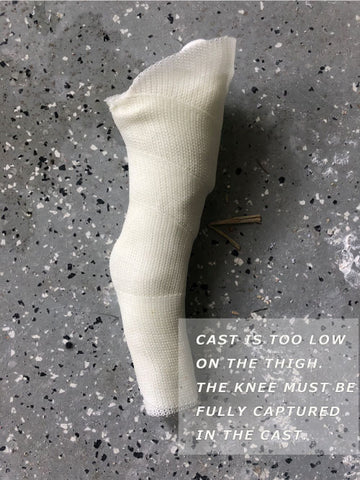
Make sure to wrap all the way up on your dog’s leg, it might feel awkward but you need to capture as much of the thigh as possible. A high thigh is needed to ensure your dog's cast will be tall enough to support the knee. It also helps our fabricators, who make the braces, find your dog’s knee center for proper placement of the hinge.
BAD CAST
-
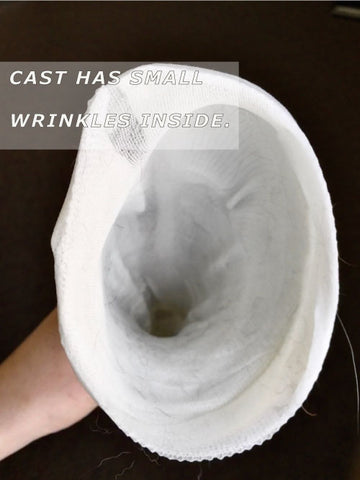
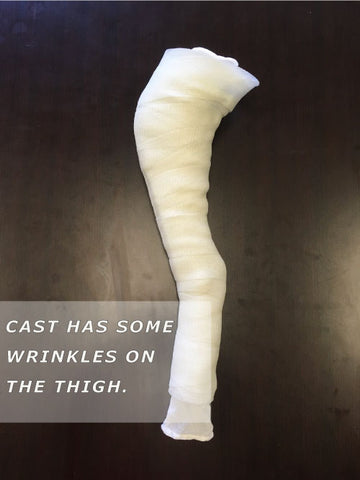
You will need to wrap snugly so that the cast conforms to your dog's leg and so the layers adhere to each other. To help the layers stick even if your wrap is a little loose, dip your hand in the casting water and compress the cast for a few seconds before starting the next roll. If your second layer is tighter than your first, then you may end up with some wrinkles on the inside of your cast.
BAD CAST |
GOOD CAST |
 |
 |
-
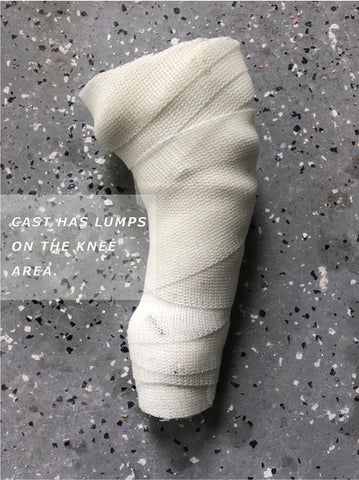
DON’T pull too tight! It may be uncomfortable for your dog if you wrap too tight and it will cause lumps in your cast. However, a few lumps and bumps are OK as long as they are small.
BAD CAST |
GOOD CAST |
 |
 |
-
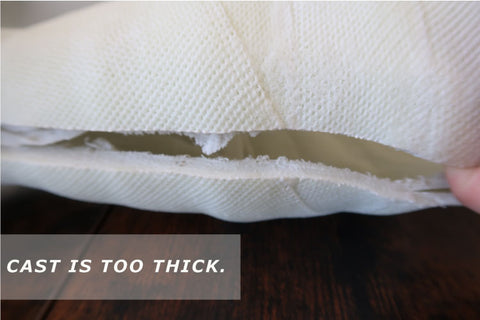
Wrap your dog’s leg 3 times, this builds support for the cast so that it won’t deform when you remove it and ship it to us. Don’t wrap more than 3 times if it’s avoidable, a thick cast isn’t necessarily an issue for us but it will make it very difficult for you to remove which may be stressful for both you and your dog.
-
After finishing wrapping your dog's leg, wait at least 3-5 minutes to let the cast set before cutting. This will ensure that the cast has set up enough so that it won’t unravel or deform when you are removing it from your dog's leg.
5. Removing the Cast
-
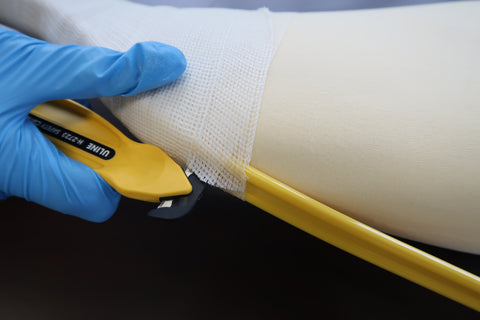
Once the cast has set for at least 3-5 minutes, hook the cutting tool at the top of the cast closest to your dog's hip. This makes cutting much easier and safer.
START AT THE TOP
-
Gently pull the cutting tool downward, following the cut strip. Move slowly and carefully so that you stay on the cut strip. If the cutting tool catches or slips off the cut strip, move the cutting tool back upward along the cut you made and reposition to cut along the cut strip.
-
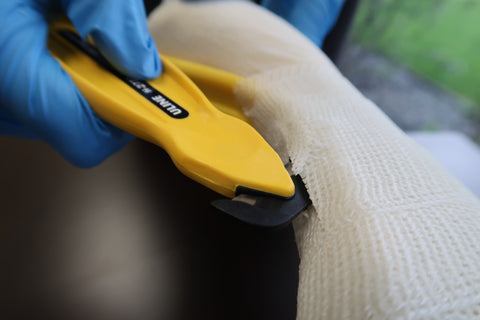
When you get down close to the hock(ankle), you may find the curve inward difficult to cut in one swipe. Simply move the cutting tool back upward along your cut and reposition to cut through all the layers. You may need to do this a few times. It's important to cut slowly when close to the end since a quick movement at your dog's paw may scare them and they may try to jump up.
CAREFUL AT THE HOCK
-
Once the cast is fully cut, remove the cut strip and fold down the top edge of the stockinette over the cast. This will make it easier for you to remove the cast.
STOCKINETTE FOLDED OVER

-
Remove the cast by opening the cut edge slightly, the cast should be fairly flexible but rigid enough to retain its shape once you're done. Gently pull downward on the cast from the top and bottom. It helps to have someone hold you dog's leg still while you maneuver the cast off.
-
Once the cast is off, you can let your dog stand up, their part of the casting is done! If you’re doing bilateral casts (casts on both sides), give your dog a break before doing their second cast. This reduces stress and lets them stretch out before casting again. Be sure to reward them with a treat at the end of each casting.
6. Preparing to Ship
-
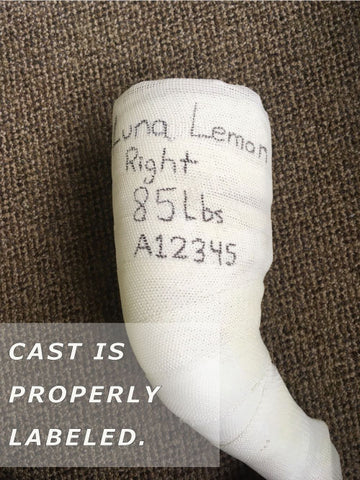
Label the cast(s) with your order number, dog's first and last name, which side was casted, and weight. This ensures that we have all the information we need right on the cast to identify your dog’s cast from others. Make sure to wait until the cast has mostly dried or else your marker may not write on the cast.
FULLY LABELED CAST
-
You can wrap the cast with newspaper or bubble wrap to prevent it from being damaged during shipment. You can also fill the cast and box with packing peanuts for extra cushion. Make sure the box you get is large enough to fit the cast without it rubbing against the walls too much.
-
Fill out and enclose the provided information form about your order in the same box as the cast. This provides us essential information so that we can begin your order as soon as we receive it.
-
Shipping information is provided when you receive your casting materials. Make sure you ship to the provided address and NOT the address the casting materials were shipped from or else your cast will get lost.
Crucial Measurements
We will need pictured measurements of your dog’s leg to ensure that the cast is fully accurate to your dog's leg. These measurements help our fabricators ensure that everything about your dog's cast matches their leg and helps reduce potential fitment issues. We will not begin the fabrication of your dogs knee brace without these measurements.
-
Measurement 1: Thigh Length. This measurement helps our fabricators confirm the length of the thigh to ensure that the brace won't be too long in the groin area.

-
Measurement 2: Knee Center. This measurement helps our fabricators identify the knee center which is crucial for the proper placement of the hinges of your dogs brace.

-
Measurement 3: Tibia Length. This measurement helps our fabricators confirm the length of the tibia section to ensure that the brace isn't too long in the hock area. This measurement is also crucial for identifying the proper placement of the hinges.

Important final note
If you are unsure about the look of your cast or any part of the casting process, call or email us with any questions you have. We are more than happy to help and let you know if your cast looks good!


